In this tutorial we'll see how to set up access control for different LUSID users so they can upload information to and administer the Configuration Store.
The goal is to give them exactly the permissions they need to perform their professional responsibilities, and no more.
Note: To complete this tutorial, you must yourself have suitable permissions. This can most easily be achieved by assigning your LUSID user the built-in
lusid-administratorrole. This should already be the case if you are the domain owner.
The users are:
An Administrator who needs to upload information to the Shared area of the Configuration Store, and also to administer users' Personal areas (that is read-write access to both areas).
An Operator who needs to upload information to their Personal area and to see information in the Shared area, but not to upload information there (that is, read-write access to the Personal area, but read-only access to the Shared area).
This tutorial assumes these users already exist in LUSID. See how to onboard users.
Note: Once permissioned, users can interact with the Configuration Store either via the LUSID web app or by calling the API directly; the access control system makes no distinction between these two workflows.
Step 1: Understanding access control in LUSID
LUSID's powerful role-based access management system consists of users, roles, policies and policy collections. In summary:
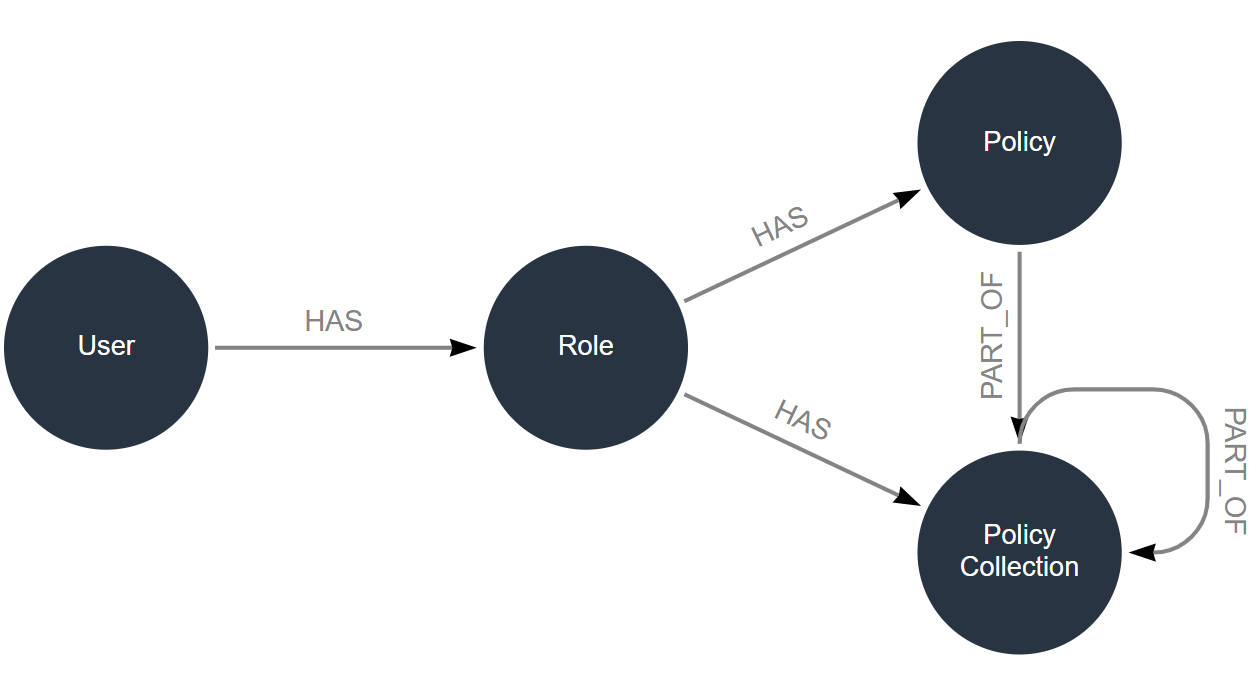
Note that an individual policy manages access to features and/or data:
Features control access to Configuration Store API endpoints. This is irrespective of whether a user ultimately interacts with the Configuration Store via the LUSID web app or by calling the API directly (since the web app itself calls the API).
Data controls access to information about configuration sets (information buckets) and configuration items (pieces of information within these buckets).
To perform any real-world operation in the Configuration Store, a user must be assigned both types of policy. This is because a data policy without an equivalent feature policy cannot perform operations, and a feature policy without an equivalent data policy yields no data.
For much more on identity and access management (IAM) in the LUSID platform, see our IAM documentation.
Step 2: Defining the roles and policies we want to create
For our users, we need the following:
User | Role | Policies |
Administrator |
|
|
Operator |
|
|
Step 3: Creating a feature policy for the Operator
The Operator requires access to CRUD API endpoints in order to upload information to and administer their Personal area. API endpoints don't distinguish between the Personal and Shared areas of the store, so these endpoints also grant the Operator permission to upload to and administer the Shared area. However, we will subsequently deny the Operator write access to the Shared area in the data policy.
A suitable feature policy should already exist by default in your LUSID domain. To examine it:
Sign in to the LUSID web app using the credentials of a LUSID administrator.
From the left-hand menu, select Identity and access > Policies:
.png "image(288).png")
On the Policies dashboard, locate the
lusid-system-configuration-all-feature-accesspolicy and click the View button to open it in the JSON editor:.png "image(289).png")
You can see that the policy grants execute permissions for all APIs ("code": "api-*") in the Configuration Store. To see how to assign this policy to the Operator (and also to the Administrator), read this section.
Step 4: Creating a data policy for the Operator
We now need to create a config-store-resources-personal-area-only data policy that grants the Operator read-write access to their Personal area, but read-only access to the Shared area:
On the Policies dashboard, click the Create policy button.
.png "image(290).png")
Provide a unique Policy code and select JSON.
.png "image(291).png")
Copy and paste the following into the code box:
Note the following:
The first
idSelectorDefinitionobject is for the Personal area ("type": "Personal") and read/write/update/delete operations are allowed ("activity": "Any").The second
idSelectorDefinitionobject is for the Shared area ("type": "Shared") and only read operations are allowed ("activity": "Read").Note: Your LUSID domain should have a default
lusid-system-configuration-all-resource-accessdata policy that you could assign to the Administrator. This policy omits the secondidSelectorDefinitionobject in the example above and sets"type": "*"in the first to allow read/write/update/delete operations in both areas.
Select Save to create the policy.
The Operator now has appropriate feature and data policies, ready to assign to their role.
Step 5: Creating a role for the Operator
Now we need to create a suitable role, since policies are assigned to roles rather than directly to users. A role should represent an aspect of that user's professional responsibilities; you can divide these responsibilities into one or many roles, depending on your needs.
We'll create a single config-store-operator role for this user, encompassing their entire responsibilities:
Navigate to the Roles dashboard.
.png "image(292).png")
Click the Create role button (top right).
Specify a unique Code for the role, and then assign the appropriate policies from the Policies > Choose dropdown:
.png "image(293).png")
Create the role.
Note that roles have a precedence, so if you do assign two roles to a person and those roles contain conflicting policies, the role with the highest precedence takes effect.
Step 6: Assigning the role to the Operator user
The last step is to assign the config-store-operator role to the LUSID user representing this person. To do this:
Navigate to the Users dashboard, find the appropriate user row, and click the Edit icon:
.png "image(294).png")
Click the Add roles button to assign the appropriate role to the user:
.png "image(295).png")
Helping users get started
The Operator can now interact with the LUSID web app straight away. Tell this person to navigate to your LUSID domain (for example https://acme.lusid.com/app) and sign in using their own account credentials.
The Operator should be able to navigate to the System Settings > Configuration store dashboard, see configuration sets in either their Personal or the Shared area, and add new sets to their Personal area:
.png "image(296).png")
To interact with the Configuration Store programmatically:
Using the Configuration Store REST API, tell the Operator to first follow these instructions to obtain an API access token. Note the API reference hosts a pre-authenticated sandbox where they can try out any FINBOURNE API.
Using an appropriate version of the Configuration Store SDK, tell the Operator to first follow these instructions to assemble credentials and authenticate securely.