In this tutorial we'll see how to use the Workflow REST API to model a workflow for a simple approvals process.
Let's imagine we want to model the process of approving some data. To do this, we first create a task definition that models the possible flows. We can then create a tasks each time we want to actually approve some data.
Note we'll only transition between states manually in this tutorial. To learn how to automate workflows, follow this tutorial on setting up a data quality control to check new pricing data for outliers.
Note: To complete this tutorial, you must have suitable access control permissions. This can most easily be achieved by assigning your LUSID user the built-in
lusid-administratorrole, which should already be the case if you are the domain owner. If you are informed you do not have a license to perform a certain operation, contact support.
Step 1: Creating a task definition to model the workflow
We must first create a task definition using the CreateTaskDefinition API, passing in:
An API access token as a Bearer token in the Authorization HTTP header. See how to obtain a token.
A
scopeandcodethat together uniquely identify the task definition.A
displayNameanddescriptionfor the task definition.A set of possible
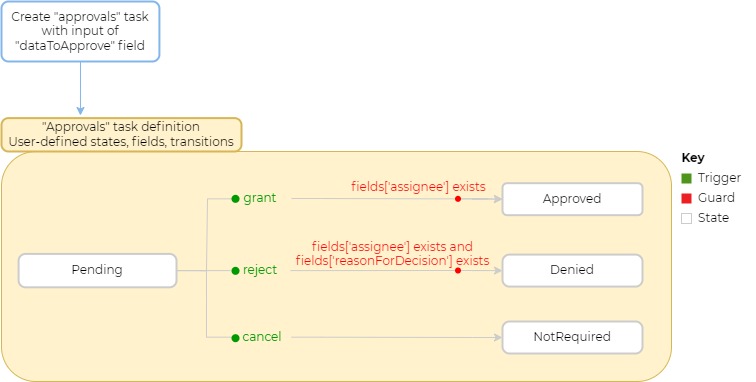
states; in our example we needPending,Approved,DeniedandNotRequired.A
fieldSchemadefining a set of fields, for our example we needassignee,dataToApproveandreasonForDecisionas fields.An
initialStateofPending, and adataToApprovefield that is required to enter this state.A set of
triggersto prompt state transitions. Each trigger should contain the following:A
namefor the trigger.The
typeof the trigger - for now onlyExternaltriggers are available.
A set of
transitionsto control movement from the initial state to all the other states. Each transition should contain the following:A
fromStatespecifying the state the transition begins in.A
toStatespecifying the state the transition ends in.The name of the
triggerprompting the transition to occur.Optionally, a
guardcondition which must be met for the transition to succeed. Read more on using guards in workflows.
Note: To avoid infinite loops, there must always be at least one terminal state within the task definition; that is, a state from which no onward transitions are possible.
Part of a response is shown below. Note the asAtVersionNumber of the task definition, which increments if you update the task definition:
Step 2: Creating a task to approve some data
Now that we have our task definition, we can test our workflow using a new approval. To do so, we create a task from our task definition and include the required fields for the task to enter its initial state and set the workflow in motion.
To create a task we call the CreateTask API, passing in:
The
scopeandcodeof the task definition.Optionally, any
correlationIdsto track and group API calls.The
nameand an appropriatevaluefor the requireddataToApprovefield:
Part of a response is shown below. Note the following:
The
asAtVersionNumberof the task, which increments if you update the task (see step 3).The task is in its initial
stateofPending.LUSID automatically creates a unique
idfor the task, which you can use to retrieve or update the task at any time.
Step 3: Updating the task to grant approval manually
Our task now exists in the Pending state. To transition it to another state, such as Approved, we can call the UpdateTask API, passing in the following:
Within the request URL:
The unique
idfor the task we want to update.A
triggerto prompt a state transition. For our example, we'll use thegranttrigger to move to theApprovedstate.
The
nameand an appropriatevaluefor theassigneefield, which is required to meet the guard on thegranttrigger.Names and appropriate values for any other fields we want to propagate, since this is a PUT operation and resources not specified are set to null (and therefore lost). In our example, we'll include the
dataToApprovefield in order to pass the data to theApprovedstate.
Part of a response is shown below. Note the following:
The
asAtVersionNumberof the task has been incremented.The task is in its terminal
stateofApproved.
Since the task is now in its terminal state, it is not possible to trigger more state transitions for this particular task. To do anything else with this workflow, we need to create a new task from our task definition using the CreateTask API.