With Lumipy, you can use the lumipy.provider submodule to create data providers that connect Python data science applications to Luminesce.
Prerequisites and setup
Prerequisites:
.NET SDK at version 8.0 or above. Note for Mac users we recommend using an x86 version; read more.
Before you begin creating Python providers, ensure you have setup your config with a Personal Access Token (PAT). For Windows, we recommend you run Windows PowerShell as administrator to send the following command, replacing <your-domain> and <your-access-token> with your own values:
Note: By default, providers are only visible to you. You can make a provider visible to all users in your domain by adding
--user==globaland--whitelist-meto the above command.
Send the following command to run a provider and complete your setup…
…you should see provider information followed by a browser window opening, prompting you to sign in. After signing in, you should see the following:
Building and running provider classes
Once you have completed the above setup, you can begin creating a Python provider. This consists of two steps:
Step 1: Building a provider class
To build a provider class you must first import the submodule:
All provider classes must be subclasses of lumipy.provider.BaseProvider and implement the following methods:
__init__(): Declare metadata such as the column and parameter content of the provider. These are built from the corresponding metadata objects underlumipy.providerand supplied tosuper().__init__.get_data(): Produce the data that is returned by the provider. Takes in a limit value, a filter representation and parameter values from the query being processed, returning a dataframe.
Note: If you are creating a provider using a Pandas dataframe, you can use Lumipy's built-in
PandasProviderclass instead; see how to do this.
Step 2: Running the provider
To run a provider, use the command line interface (CLI) to run Python files containing provider objects, CSV files, and more; see how to do this. Note you can alternatively run an instance of the provider class in ProviderManager. This starts up the provider, ready for querying in Luminesce; running via the CLI performs this step automatically.
Example
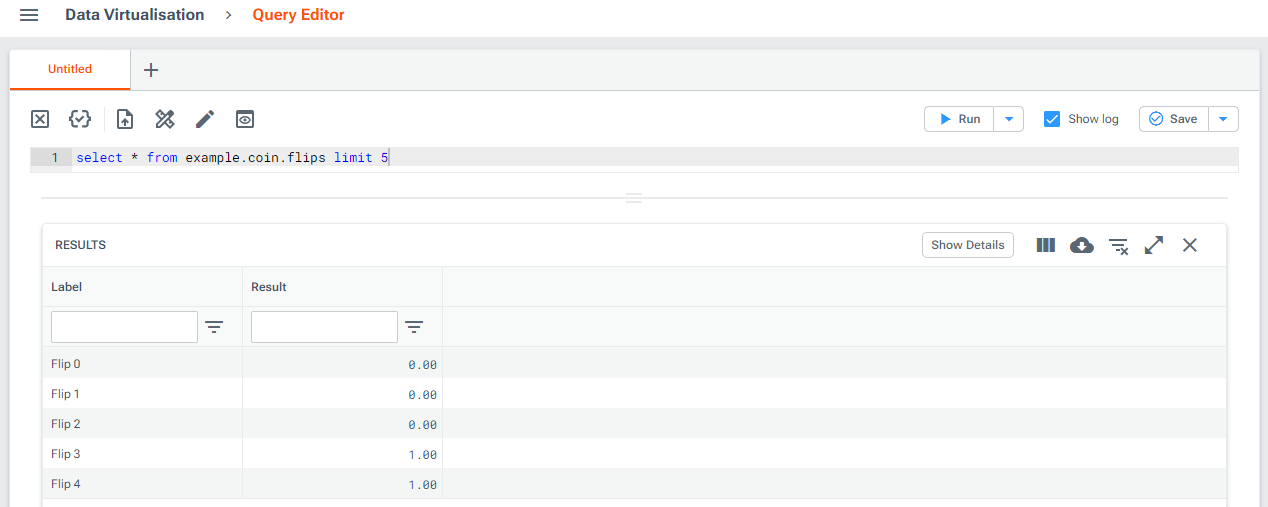
For example, you could build and run a provider for simulating a set of coin flips, with two columns Label and Result, and one parameter Probability with a default value of 0.5. To do this, you might:
Import the
lumipy.providersubmodule and other required packages for this example.Create a provider class that inherits from the
BaseProviderclass. This class should define the following:An
__init__()method declaring the column and parameter metadata for the provider. This, alongside a name for the provider, is then supplied tosuper().__init__.A
get_data()method for getting and returning data from the provider. Thecontextargument is used to specify information for querywhereclauses, limits and parameters. For this example:The
limitvalue for the number of rows to return is set to100if a query doesn't specify a limit.Parameter values are retrieved from the parameters dictionary and must be within a specified range; an error is thrown in Python if the value is out of range and this is reported back in the progress log and query status.
The data - in this example coin flips - is generated and a dataframe is returned.
Instantiate the provider object using the
CoinFlipsclass.
You can then save the code above as a Python file, coinflips.py for example, and use the command line interface to run your Python provider on the fly:
You can run providers in this way for:
.pyfiles containing provider objects.csvfilesDirectories containing
.csvand.pyfiles
Once running the provider, you can query it via Luminesce until you choose to shut it down:
Building providers for Pandas dataframes
You can use the built-in PandasProvider class to easily pass a Pandas dataframe into the provider manager and make its data available in Luminesce.
To do this, simply input a dataframe object to the PandasProvider class and run via the CLI. For example, to build a provider for one of the transaction source files from this tutorial, you might:
Read data into Pandas from a CSV file.
Pass the Pandas dataframe object and a provider name to the built-in
PandasProviderclass.Run the provider via the CLI.
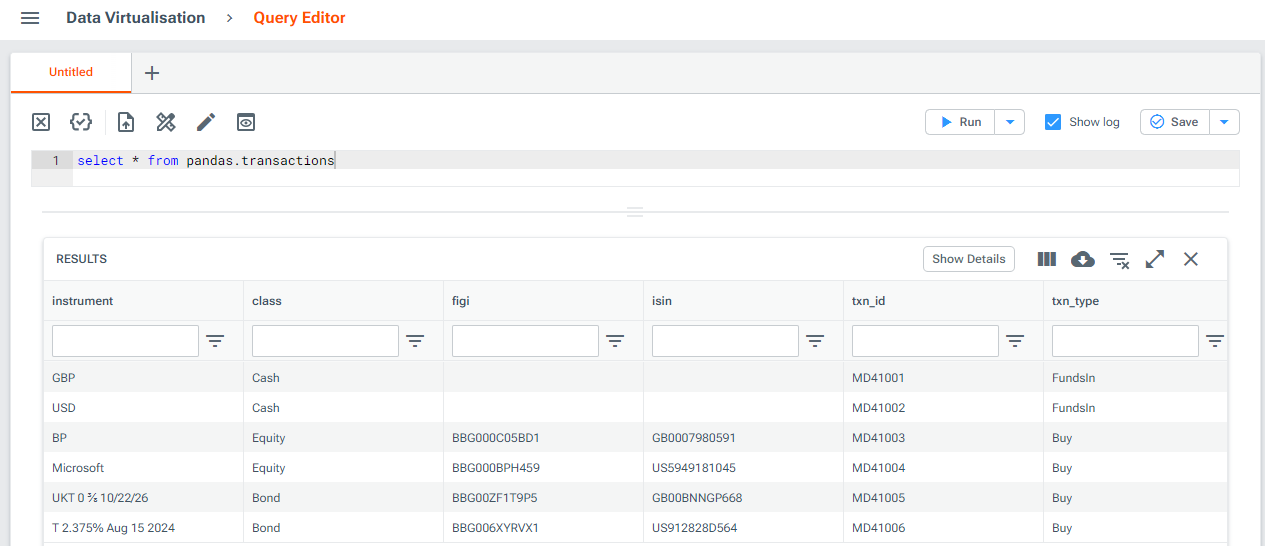
Once running, this provider will appear as pandas.transactions in Luminesce. You can query it until you choose to shut it down. Note you can set name_root = None in PandasProvider to change the provider name prefix.
If the input to PandasProvider is not a dataframe, the constructor passes the value into pandas.read_csv and uses the resultant dataframe. You can use this approach to build a provider from:
A local filepath
A URL
An IO stream
Anything else the function supports
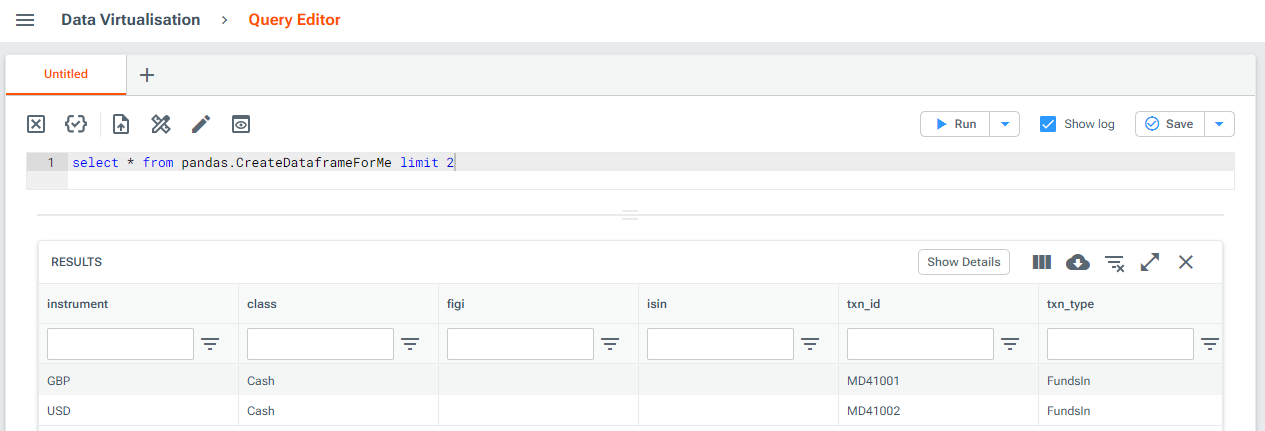
For example, you could modify the code from steps 1-3 above to pass a CSV file into PandasProvider before running via the CLI as usual:
The provider runs as usual, allowing you to query the resultant dataframe via Luminesce:
Appendix A: .NET for Mac users
Mac users with an Apple silicon processor may experience the following error when attempting to run a provider locally:
You can follow these steps to overcome this issue:
Install Rosetta 2. You can do this via the command line:
Once installed, send the following command to locate Rosetta:
Add the resultant path to your
$PATHenvironment variable. Read the Apple documentation on how to do this.Install the x86 version of .NET 8.0 or above. To do this, you can download the .NET 8.0 x64 installer for macOS and copy to a folder on your
$PATHenvironment variable. Alternatively, you can send the following command:
You can send the following command to check the file path is correct, containing a x64 folder, for example /usr/local/share/dotnet/x64/shared/Microsoft.AspNetCore.App:
If the path does not contain a x64 folder, uninstall .NET and reinstall the .NET x64 installer for macOS as mentioned in step 2 above. You should also ensure there are no .NET Arm64 versions on your path.