In this tutorial, we'll see how to use data policies and roles to set up scope-specific access controls for properties in LUSID.
Let's imagine we have a person entity that is configured with the properties Person/Details/Country and Person/SensitiveDetails/Address. We want to set up access controls that:
Allow most users to view
Person/Details/Countryand other properties within thePerson/Details/*scope.Allow a small number of privileged users to view
Person/SensitiveDetails/Addressand other properties within thePerson/SensitiveDetails/*scope in addition to properties in thePerson/Details/*scope.
To do this, we need to create and assign two different roles to our users, one role containing a feature and data policy that allows users to make requests to the GetPersonPropertyTimeSeries API and read Person/Details/* property definitions and property values data, and the other role containing a data policy that allows read-only access to Person/SensitiveDetails/* property definitions and property values data.
Note: To complete this tutorial, you must have suitable access control permissions. This can most easily be achieved by assigning your LUSID user the built-in
lusid-administratorrole, which should already be the case if you are the domain owner. If you are informed you do not have a license to perform a certain operation, contact support.
Prerequisite: Setting up property definitions and person entities
Creating property definitions
For our scenario, we first need ensure we have the following property definitions:
Person/Details/CountryPerson/SensitiveDetails/BankAccount
To create Person/Details/Country , we can call the CreatePropertyDefinition API, passing in the following:
curl -X POST "https://<your-domain>.lusid.com/api/api/propertydefinitions"
  -H "Authorization: Bearer <your-API-access-token>"
  -H "Content-Type: application/json-patch+json"
  -d "{
    "domain": "Person",
    "scope": "Details",
    "code": "Country",
    "displayName": "Country trader operates in",
    "dataTypeId": {"scope": "system", "code": "string"},
    "lifeTime": "TimeVariant",
    "constraintStyle": "Property",
    "propertyDescription": "Country trader operates in"
}"
To create Person/SensitiveDetails/Address , we can call the CreatePropertyDefinition API again, passing in the following:
curl -X POST "https://<your-domain>.lusid.com/api/api/propertydefinitions"
-H "Authorization: Bearer <your-API-access-token>"
-H "Content-Type: application/json"
-d "{
  "domain": "Person",
  "scope": "SensitiveDetails",
  "code": "Address",
  "displayName": "Trader home address",
  "dataTypeId": {"scope": "system", "code": "string"},
  "lifeTime": "TimeVariant",
  "constraintStyle": "Property",
  "propertyDescription": "Home address of trader"
}"
Read more on creating a property type.
Creating a person entity
We also need to ensure we have a person entity that has been decorated with the above properties. For this tutorial, let's create a trader person entity to decorate with some properties. To do this:
Create a property definition for a person entity identifier. The following call creates a property definition with a 3-stage property key of
Person/Traders/TraderId:curl -X POST "https://<your-domain>.lusid.com/api/api/propertydefinitions" -H "Content-Type: application/json-patch+json" -H "Authorization: Bearer <your-API-access-token>" -d "{ "domain": "Person", "scope": "Traders", "code": "TraderId", "valueRequired": true, "displayName": "Trader identifier for Person entities", "dataTypeId": { "scope": "system", "code": "string" }, "lifeTime": "Perpetual", "constraintStyle": "Identifier", }"Call the UpsertPerson API to create a person entity. Note the
labelValueyou give the trader identifier must be unique among all traders represented in LUSID, in this caseTrader5.curl -X POST "https://<your-domain>.lusid.com/api/api/persons" -H "Content-Type: application/json-patch+json" -H "Authorization: Bearer <your-API-access-token>" -d "{ "identifiers": { "Person/Traders/TraderId": { "key": "Person/Traders/TraderId", "value": { "labelValue": "Trader5" } } }, "displayName": "John Doe", "description": "A portfolio manager and trader in US investments", "properties": { "Person/Details/Country": { "key": "Person/Details/Country", "value": { "labelValue": "USA" } }, "Person/SensitiveDetails/Address": { "key": "Person/SensitiveDetails/Address", "value": { "labelValue": "123 New Lane, New York" }, "effectiveFrom": "2016-07-01T00:00:00.0000000+00:00" } } }"
Read more on creating person entities.
Step 1: Creating a data and feature policy for unprivileged and privileged users
You can create policies to control access to the following actions for properties:
Read
Update
Delete
Any (all of the above)
For this tutorial, we will focus on controlling read access to various datapoints, but the same steps can be followed to control access for all of the actions above.
Creating a policy for a less privileged user
We first need to create a policy that allows a user to do all of the following, but not read Person/SensitiveDetails/*:
Grants access to the following LUSID features:
GetPersonAPIGetPersonPropertyTimeSeriesAPI
Grants read-only access to the following data points:
All person entities.
Property definitions and property values under the scope
Person/Traders/*.Property definitions and property values under the scope
Person/Details/*.
To create a policy for all of the above:
Sign into the LUSID web app and use the left-hand menu to navigate to Identity and Access > Policies:
.png "image(272).png")
Click the Create policy button.
.png "image(273).png")
Specify the following:
A unique Policy code; we'll call our policy
allow-read-non-sensitive-person-properties.A friendly Description for the policy.
Whether this policy will Allow or Deny access to the specified features and data.
.png "image(274).png")
In the Features tab, select the checkbox of each feature (corresponding to API endpoints) to add to the policy:
.png "image(275).png")
Selecting which API endpoints is subjective, but to grant read-only access to person entities, you might choose:
GetPerson,ListPersons,GetPersonPropertyTimeSeries.API endpoints are identified by their operation ID. Examine the API reference for more information on each endpoint; the operation ID is printed under the URL:
.png "image(276).png")
Select Next to reach the Data Resources tab. For our required data policies, specify the following:
To grant access to read all person entity data, locate Person from the list and add the Read action. Choose Identifier as Selector and specify
*to apply the policy to every person scope and code..png "image(277).png")
To grant access to the
Person/Traders/*andPerson/Details/*property definitions and values, locate both Property Definition and Property Value from the list and add the appropriate Actions. For both resources, we need to supply two selectors:Choose Identifier as Selector and specify
Personas Domain,Tradersas Scope, and*as Code.Choose Identifier as Selector and specify
Personas Domain,Detailsas Scope, and*as Code..png "image(278).png")
Select Next and Done to review the policy, and Save to create your new policy.
.png "image(280).png")
Creating a policy for a privileged user
We need to create a separate data policy that allows a user to read property definitions and values under the scope Person/SensitiveDetails/*.
To create this policy, we can follow the previous steps to create a policy via the LUSID web app, this time selecting only Data Resources, choosing Identifier as Selector, and specifying Person as Domain, SensitiveDetails as Scope, and * as Code.
.png "image(281).png")
Step 2: Creating roles for unprivileged and privileged users
Now that we have created the required policies, we need to assign the policies to different roles which we can then assign to each user. For our tutorial, we need the following roles:
unprivileged-userassigned the policyallow-read-non-sensitive-person-properties.privileged-userassigned the policiesallow-read-non-sensitive-person-propertiesandallow-read-sensitive-details-person-properties.
The simplest way to create a role is via the LUSID web app; to do this:
Sign into the LUSID web app and use the left-hand menu to navigate to Identity and Access > Roles:
.png "image(282).png")
Let's first create our unprivileged role:
Select Create role and specify the following:
A Code to uniquely identify the role; we can use
unprivileged-userfor our first role.A friendly Description for the role.
An Activation date and, optionally, Deactivation date for the role. For our tutorial, we want the role to be active immediately, so we can specify the current date.
Use the Policies > Choose dropdown to assign policies to the role. For our unprivileged role, we need to add the
allow-read-non-sensitive-person-propertiespolicy..png "image(283).png")
Select Create to create the role.
Now let's create our more privileged role:
Select Create role and specify the following:
A Code to uniquely identify the role; we can use
privileged-userfor this role.A friendly Description for the role.
An Activation date and, optionally, Deactivation date for the role. For our tutorial, we want the role to be active immediately, so we can specify the current date.
Use the Policies > Choose dropdown to assign policies to the role. For our privileged role, we need to add both the
allow-read-non-sensitive-person-propertiesandallow-read-sensitive-details-person-propertiespolicies..png "image(284).png")
Select Create to create the role.
Note: Depending on other existing roles and policies in your domain, you may need to set a precedence for each role to determine which policies take effect in the event of a conflict. Read more on setting precedence for a role here.
Step 3: Assigning roles to users and seeing the access controls in action
Once we have created the roles, we can assign them to our desired users via the LUSID web app to enforce who can view properties containing sensitive data. To do this:
Sign into the LUSID web app use the left-hand menu to navigate to Identity and Access > Users.
Locate a user to assign a role to and select Edit.
.png "image(285).png")
Click Add roles and select the
unprivileged-userrole we made earlier..png "image(286).png")
Click Save to add the role to the user.
To create a privileged user, repeat steps 2-4, additionally assigning the
privileged-userrole to the user..png "image(287).png")
Once a user is assigned the unprivileged-user role, we can see the policy in action by having the user call the GetPersonPropertyTimeSeries API, passing in the following:
curl -X GET
  "https://<your-domain>.lusid.com/api/api/persons/Traders/TraderId/Trader5/properties/time-series?propertyKey=Person%2FDetails%2FCountry"
  -H "Authorization: Bearer <your-API-access-token>"
Part of the response is as follows; the unprivileged user can access the non-sensitive data:
{
  "values": [
    {
      "value": {
        "labelValue": "USA"
      },
      ...
However, if the unprivileged user attempts to view properties under the Person/SensitiveDetails/* scope by passing in the following:
curl -X GET
  "https://<your-domain>.lusid.com/api/api/persons/Traders/TraderId/Trader5/properties/time-series?propertyKey=Person%2FSensitiveDetails%2FAddress"
  -H "Authorization: Bearer <your-API-access-token>"
The request fails with part of the response as follows:
{
"name": "AccessDenied",
"title": "Access cannot be granted",
"status": 403,
"detail": "Access to perform the requested action cannot be granted due to insufficient privileges. Please contact your organisation's administrator.",
"instance": "https://<your-domain>.lusid.com/app/insights/logs/0HN1UO1IR6S4U:00000131",
...
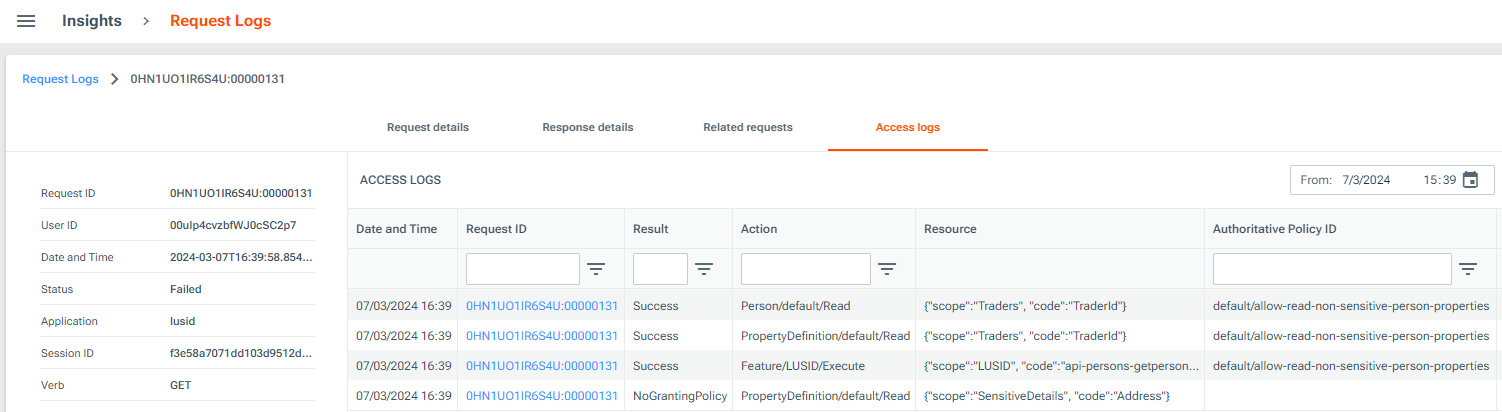
}We can follow the instance URL and look under the Access logs tab to understand which policy is required to gain access to such data:
If our privileged user attempts the same API call, the user can read the sensitive data; part of the response is as follows:
{
  "values": [
    {
      "value": {
        "labelValue": "123 New Lane, New York"
      },
     ...