When you subscribe to an integration which requires files to be transferred via SFTP (such as JPMorgan IMOS), we provision your LUSID domain with a schedule which you simply need to enable on Day One to allow data files to be transferred to the relevant integration folder in LUSID Drive. LUSID creates a record of each transferred file so you can easily track the status of your data files as they're processed.
This article explains how to enable the schedule on Day One, view the file transfer records it creates, and monitor runs of the schedule.
Setting up the integration file transfer schedule
Note: This is a one-time setup. Once the schedule has been enabled for the first time, you do not need to repeat the steps for new integrations.
To set up the integration file transfer schedule:
Ensure you have already contacted your FINBOURNE sales representative and have the following:
Your LUSID domain provisioned with the relevant integration, such as JPMorgan IMOS.
Opened an SFTP connection with your LUSID domain.
Enable the schedule. To do this:
Sign in to the LUSID web app using the credentials of a LUSID administrator.
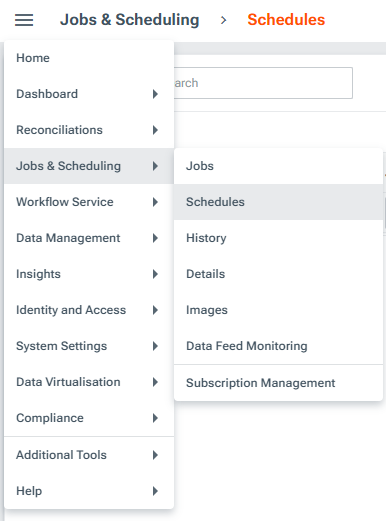
From the top left menu, select Jobs & Scheduling > Schedules.

In the Schedules page, select the Unpause icon on the
Drive-SFTP-FileTransferschedule.
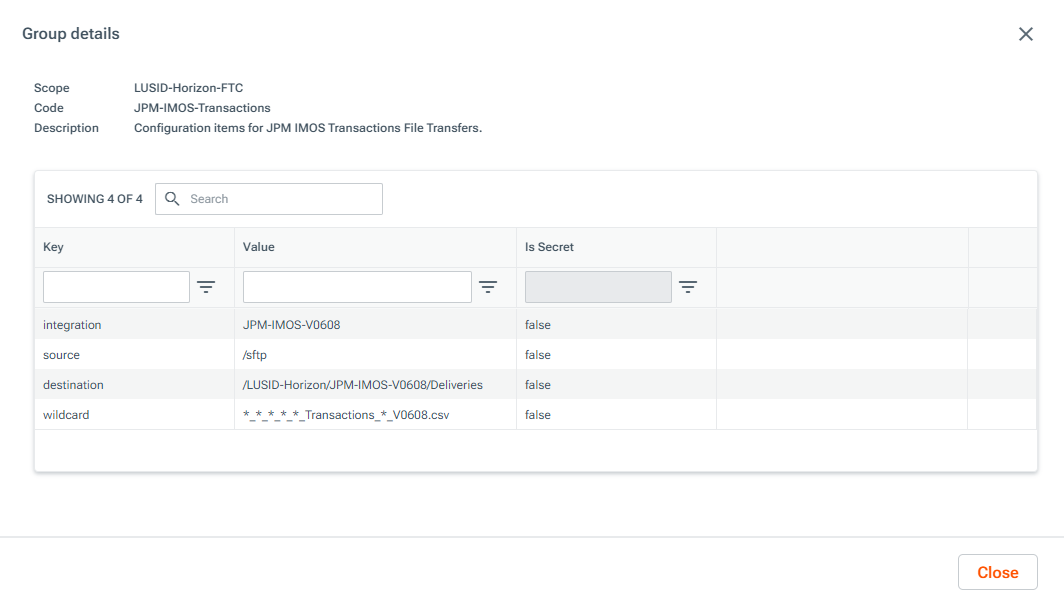
Once the schedule is enabled, any new files received in LUSID are transferred from the sftp folder in Drive to a Deliveries folder for the relevant integration. For example, a new JPMorgan IMOS file with a filename matching the wildcard defined in its configuration set (see below) is copied to LUSID-Horizon/JPM-IMOS-V0608/Deliveries.

Note the following:
By default, the schedule runs hourly to copy the latest data files for your chosen integrations into the right location, ready for processing.
You can manually run the schedule at any time to immediately transfer your files into the relevant
Deliveriesfolder. To do this, locate the schedule in the LUSID web app under Jobs & Scheduling > Schedules and select Run now.
Each integration you subscribe to has one or more corresponding configuration sets, one per file type, containing the following information for your reference:
integration: The data vendor the file transfer configuration relates to.source: The folder location in Drive the file transfer job looks within for new data files.destination: The folder location in Drive the file transfer job copies new data files to.wildcard: The matching pattern a new file name must meet for the file transfer job to move it to the relevantDeliveriesfolder.
You can view configuration sets in the LUSID web app by navigating to System Settings > Configuration Store and selecting the Shared Keys tab. All file transfer configuration sets are under the scope LUSID-Horizon-FTC.

Viewing file transfer records
When the schedule runs and finds a new file, a record is created within LUSID as the custom entity type LUSIDHorizonFileTransferCoordinatorRecord. You can view the transfer record for each file via the LUSID web app by navigating from the top left menu to Data management > Custom Entities:

Each record is populated with the following fields:
Field | Information |
| The name of the file from the vendor. |
| The name of the integration the data relates to. |
| The datetime FINBOURNE received the file from the vendor. |
| The datetime the file arrived in the |
| Indicates whether the file has been successfully copied to the relevant
|
| The location of the delivered file in Drive. |
| The last time the record was updated; this typically indicates when a schedule last finished a step in its process. |
| Indicates the file's processing progress once it reaches the relevant
|
| The number of times the relevant integration orchestrator has attempted to process the file once it reaches the relevant |
| The location of the file in Drive once it has been processed by the relevant integration orchestrator. |
| A field you can use to specify any other details, for example if you have manually retried the file. |
Note a LUSIDHorizonFileTransferCoordinatorRecord entity must exist for every file. If you manually upload a file to a Deliveries folder, a LUSIDHorizonFileTransferCoordinatorRecord is automatically created for the file.
Monitoring schedule runs and troubleshooting errors
You can monitor the status of file transfer schedule runs by signing into the LUSID web app and navigating from the top left menu to Jobs & Scheduling > Data Feed Monitoring.

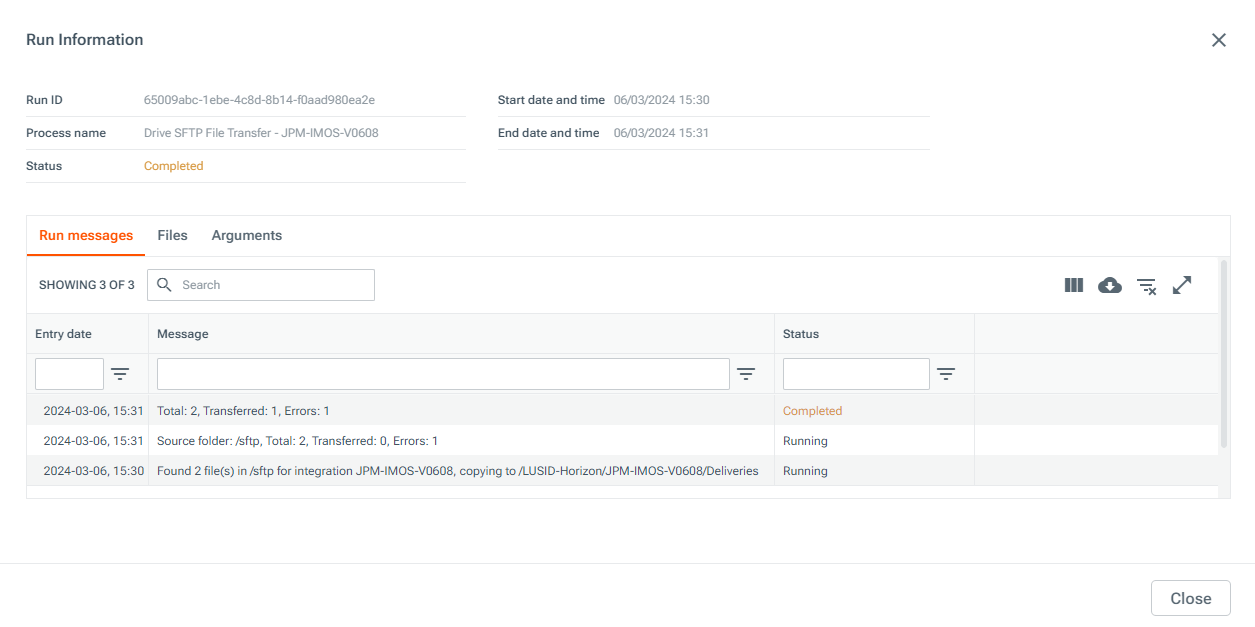
The Rows processed column tells you the number of files the schedule attempted to transfer and how many completed successfully or failed.
You can click the Process name to view previous runs of the schedule, or click the View icon to see more details on the latest run in the Run Information screen:

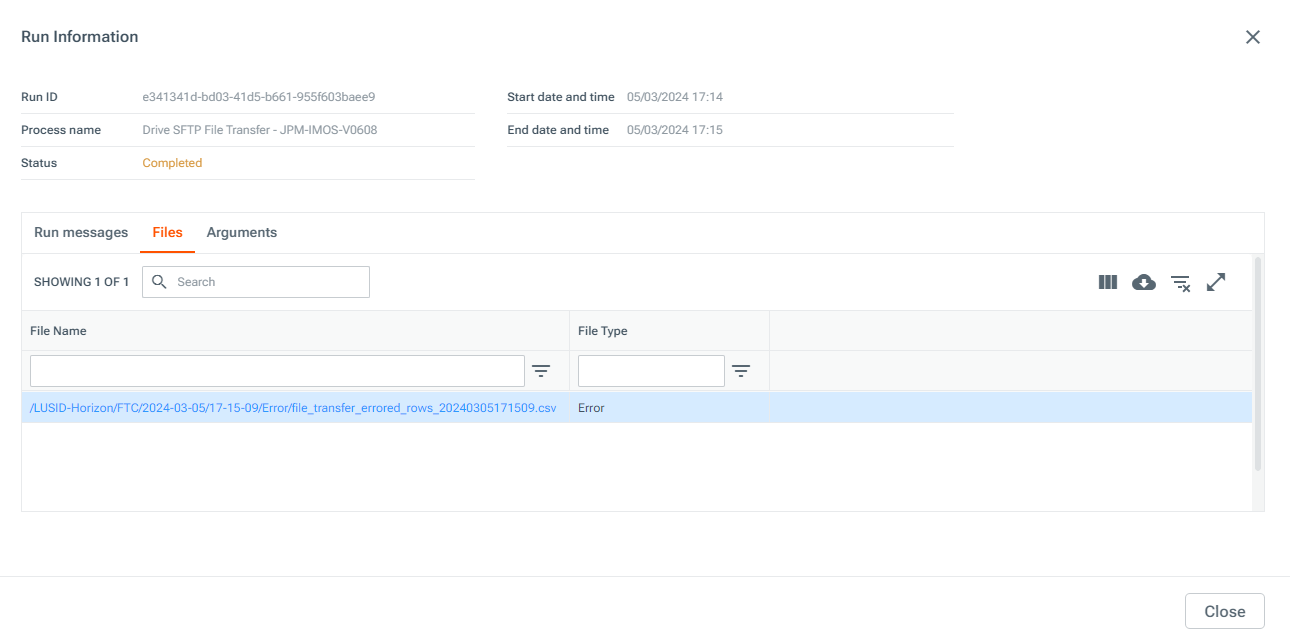
If a run encounters an error, the schedule creates an output file in Drive that provides more details on errored rows. To view an output file, go to the Files tab in the Run Information screen and click on the hyperlink in the File Name column; this takes you to the file location in Drive:

File failing to be transferred
If a file fails to be transferred, check the filename matches the wildcard pattern defined in its related integration FTC configuration set.
Note the sftp folder in Drive is read-only - you cannot manually upload a file to it. You can manually upload a file to the relevant Deliveries folder in Drive; if doing so, you must ensure the filename matches the defined wildcard pattern and a LUSIDHorizonFileTransferCoordinatorRecord exists for the file.